 There have been but a handful of days in my entire life when, mostly in early summer, I've woken up, rolled out of bed, and miraculously looked adequately presentable. Something about that sun-kissed glow, the perfectly-tussled bedhead-- so effortless. However, I can't be so lucky every day and more often than not, I need a bit of help. Recently, instead of putting on my whole "face," I've been doing the bare minimum for some barely there vibes. Since I had so much fun putting together a post about my nighttime skincare routine, I decided to do one for my morning ritual. All you really need is some lotion, a dab of foundation, highlighter, some strategically-placed bronzer, and mascara. Ready? Let's go!

Showing posts with label makeup. Show all posts
Showing posts with label makeup. Show all posts
(Almost) Barely There Makeup
There have been but a handful of days in my entire life when, mostly in early summer, I've woken up, rolled out of bed, and miraculously looked adequately presentable. Something about that sun-kissed glow, the perfectly-tussled bedhead-- so effortless. However, I can't be so lucky every day and more often than not, I need a bit of help. Recently, instead of putting on my whole "face," I've been doing the bare minimum for some barely there vibes. Since I had so much fun putting together a post about my nighttime skincare routine, I decided to do one for my morning ritual. All you really need is some lotion, a dab of foundation, highlighter, some strategically-placed bronzer, and mascara. Ready? Let's go! Beauty for Fall

I know we're still about a week away from actually fall but that doesn't mean we can't start getting our autumn faces ready. For me, this season is all about rich color and layering textures. I barely fuss with my makeup in the summer because I know I'm going to sweat it all off anyway but come September, I go all in. Here are some of my favorites!
Daytime Smoky Eye

I rarely deviate from my everyday makeup routine. Every once in a while though, I get the urge to change it up. Don't we all? I swear by a smoky eye. I know that it's usually reserved for romantic evening outings but I don't see why you can't rock it in the daytime hours.
 Begin by spreading the lightest color (I use an ivory) from the eyebrow all the way down to the crease. Brush the second lightest (I use a brownish light grey) over the lid. Then, add the darkest (I use black) around the edges and blend it into the crease. For the eyeliner, use liquid and bring it all the way from the tear duct to the little "swoop" on the edge. Smudge some pencil liner along the bottom lash line and add mascara as you usually would.
Lovely, right? Once you get the hang of the smudging/blending, it's pretty simple. Practice makes perfect!

In the Makeup Chair: Contouring
A lot of you have been asking for makeup videos. Well, you got it dude! Here's how I contour. I exaggerated it in the video so it would be easy to see. Hopefully I'll get better at this video stuff because it's actually kinda fun!

xo,
e.m.
What I used: Boots No. 7 foundation in Deeply Beige, Chanel Blush in Plum Attraction, Sonia Kashuk concealer, H&M Bronzer (and brush), Ultra Repair Cream.
xo,
e.m.
How To: Dark Red Lip

What if I told you that you can indulge in a deep, dark, red lip without having to buy a new lipstick color? What if I also told you that this color would be multi-dimensional and go beyond your wildest dreams? I'm not kidding. I learned this little trick and I'd be a terrible person to keep it from you all.

For the perfect dark red lip, you'll need your normal red lipstick (my absolute favorite is "Passion" by Chanel) and a dark lip pencil. I used "Currant" by Mac. It's a very deep reddish-purple color. If you don't have lip liner on hand, you can use eyeliner. Either dark brown on black will work! Be sure to moisturize your lips beforehand because darker lipstick tends to accentuate dry and cracked lips. My lips are almost permanently chapped all winter long but Mac's Lip Conditioner works miracles.


Begin by moisturizing your lips. Let them dry a bit and then apply your favorite red to the top and bottom. Apply liberally so you'll have more to work with when it comes time to blend. Apply the liner and don't be afraid to make it thick! Rub your lips together and it should be blended perfectly. MWAH!
xo,
e.m.
my makeup bag + tips:

The older I get, the more I enjoy playing with makeup. I never used to wear it when I was a redhead. (Whoa, remember those days?) Now that my hair is a more neutral color, I feel like I can experiment a little bit more. Sometimes, I go a little overboard. Sometimes, going a little overboard is okay. I've shared my makeup bag on here before but seeing as I've been getting a lot of questions lately about the products I use, I figured that I'd share again, along with a few tips.

The Skin. Never, EVER underestimate the power of a healthy diet and a good night's sleep. Ever since switching to a vegan diet, I rarely break out and my skin tone is (for the most part) consistent, even without foundation. Most days, I just toss on some bronzer and call it a day. I've learned that it's good to skip the heavy makeup and let your skin breathe, especially in warmer weather. Can't find a highlighter? No problem whatsoever. I use a bone-colored eye shadow. In my mind, the two are interchangeable. One last tip: a concealer stick works fantastically if you don't have any eye makeup primer on hand or just want to save a little bit of money. bareMinerals Matte Foundation, Sonia Kashuk Concealer Stick, Boots No. 7 Matte Foundation, Ulta Eyeshadow in Bone, e.l.f. Bronzer, Mary Kay brushes.
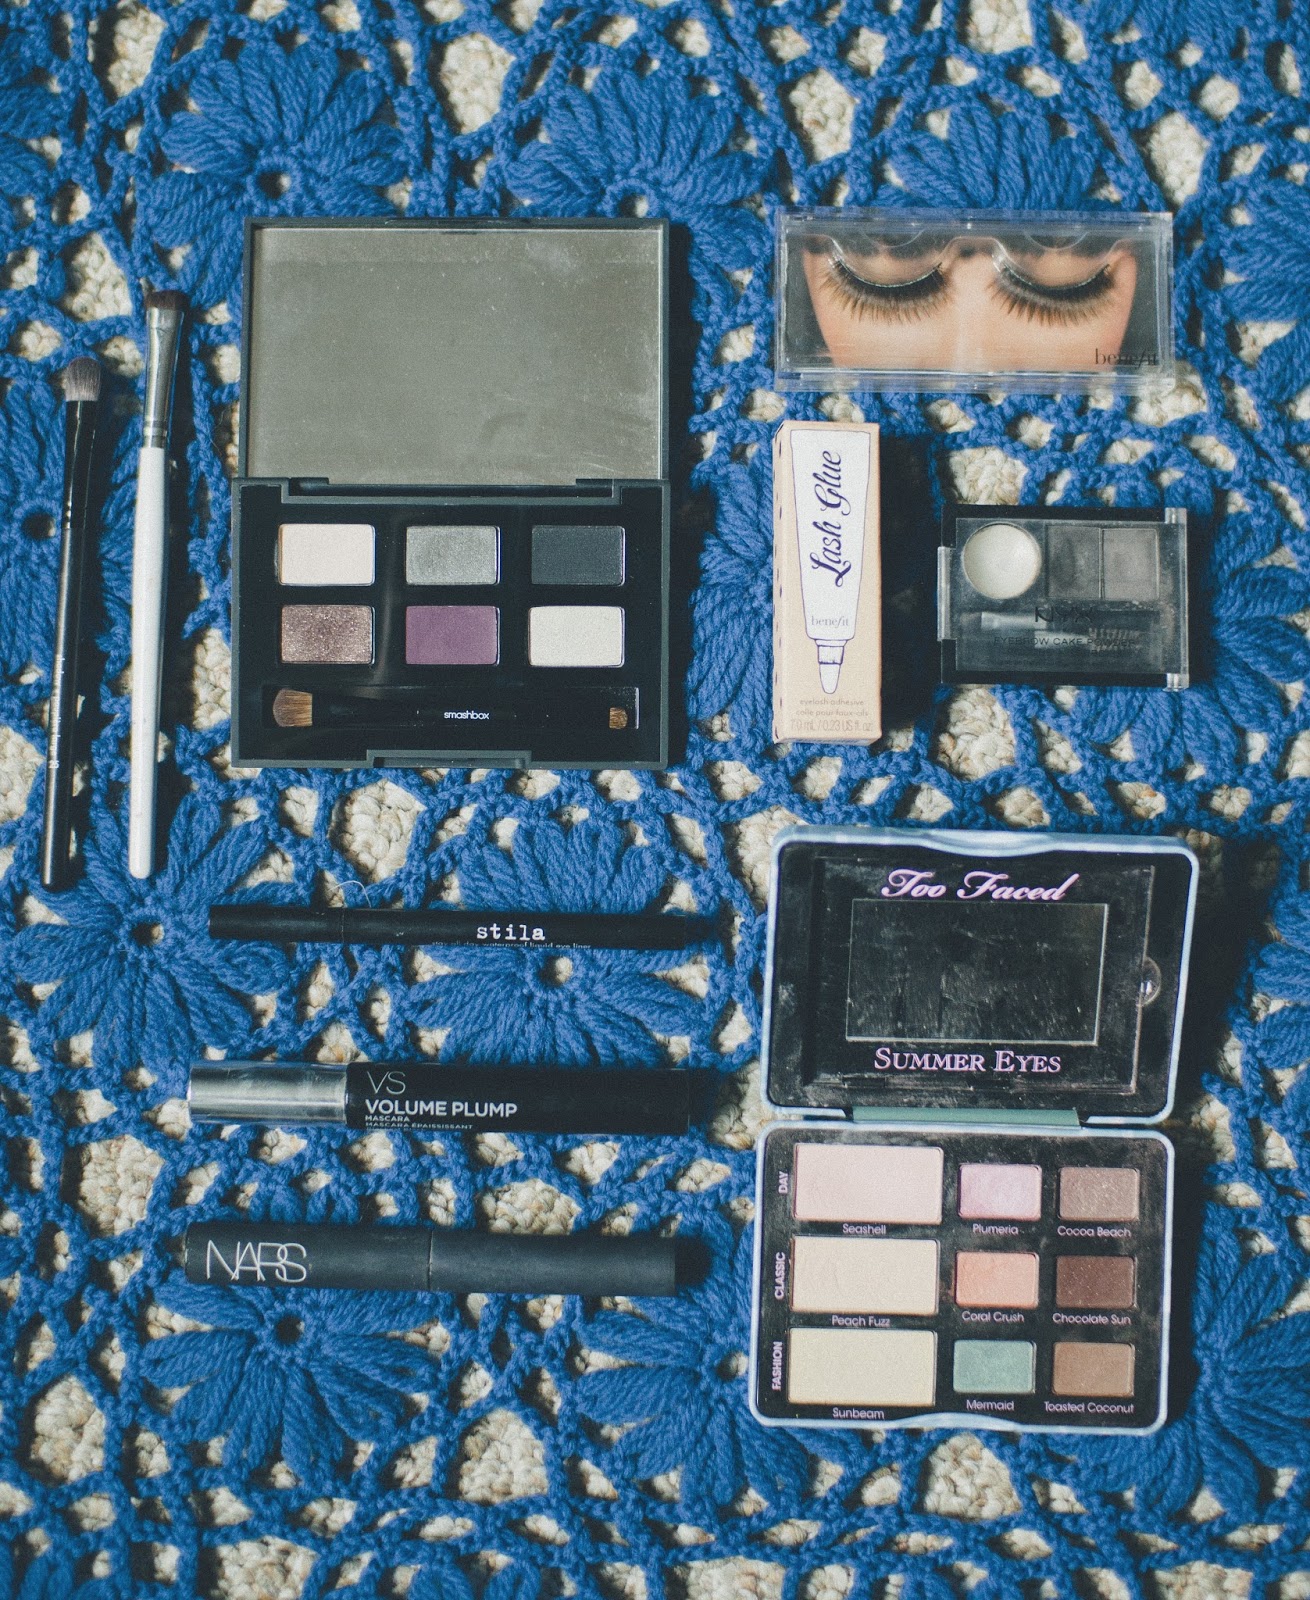
The Eyes. For me, the eyes are the main event. I don't wear eyeshadow every day but I always do rock the cat eye liner and some mascara. When I do wear eyeshadow, I go with a more smokey look. I'll be sharing a tutorial soon but until then, I'll let you in on a huge secret: the little illustrations that come with eyeshadow palettes that show you where to put each color? These are pure gold! Even if you don't go with the suggestions exactly, they're a great jumping-off point. So how about mascara? I like to layer. I use a lengthening mascara, use an eyelash curler, and then a volumizing mascara. Could be all in my head but it seems that this creates the most full and noticeable lashes. For days when I need a little extra, I rock falsies. They're fun but definitely take some getting used to. The last thing and the most important thing that I take care of at this step in my makeup routine is to take care of my eyebrows. In my opinion, the eyebrows make the biggest difference. Smashbox Smokebox II, Too Faced Summer Eyes, Nars Larger Than Life Mascara, Victoria's Secret Volume Plump Mascara, Stila Stay All Day Waterproof Eyeliner, Benefit Pinup Lashes and Lash Glue (they're reusable!), NYX Eyebrow Kit, Sephora brush.

The Lips. I used to underestimate my lips all the time but lately, I haven't been able to leave the house without wearing some sort of light pink or nude lip color. I also find myself constantly exfoliating and moisturizing them. Ever since I started doing so habitually, I've found that my already full lips have become even more plump. Always a good thing, right? Whenever I tend to my lips, I do so in this order: exfoliate, moisturize, and then add color. I do this once every couple of hours. It may seem a little tedious but it makes a huge difference. Plus, who wants to walk around with dry lips? Certainly not I. LUSH Mint Julips Lip Scrub, EOS Lip Balm, C.O. Bigelow Apothecaries Mentha Lip Balm, MAC "Snob" Lipstick, Lime Crime "Coquette" Lipstick, Yves St. Laurent "Pink Lingerie" Lipstick. (The YSL one is my absolute favorite.)
 The Scent. Some may overlook the scent, which is a shame because it's so important and also so much fun! A good scent is certainly difficult to find but at least it's a chore that involves smelling nice things. I like to have different scents for different occasions, even though I always end up wearing Chanel because it makes me feel fabulous. If you don't know where to start, Chance, Lucky You, and Daisy are all great options.
Hope that this little peek into my makeup bag as well as a few of my tips was helpful to those of you with questions and informative for the rest of you! Since I'm very much into trying new things, I'd love it if you would share some of your favorite beauty products with me in the comments.
xo,
e.m.
a few of my favorites: makeup
 So, I've never been super into makeup. I wear it, yes, but I never really invested my time (and money... oh boy, makeup is expensive) until recently. I'm a bit addicted because putting on makeup is a lot like painting! Since I dropped out of art school, I haven't done much of that so makeup has become, dare I say it, kind of... a hobby for me? I'm by no means great at it but I do enjoy experimenting quite a bit! Since I changed up my daily routine, I've gotten lots of questions about the products I use so here are a few of my favorites:
 The Scent: I love Daisy: Eau So Fresh by Marc Jacobs because it's light and yet somewhat sultry. It's perfect for a day in the office or a date night. I often find myself sniffing my wrist or hair just for a little whiff whenever I'm wearing it.

The Tools: I don't use many fancy things, just a blush brush, an eye shadow brush, a smudge brush, and this scary-looking contraption called an eyelash curler that I don't even know if I'm using it correctly. The curler and smudge brush are from Target, (e.l.f.) the blush brush from Mary Kay, and the Eyeshadow brush from Sephora.
 The Base: I start out with Boots No7 matte foundation. I just use my fingers because I think that they do just as good of a job as those little squishy sponges but without all of the waste. I then use bareMinerals matte powder. For a concealer, I use this stick from Sonia Kashuk. (available from Target) And, most importantly, I use NYX's eyebrow kit for the brows. (I love this because it comes with a primer and two brushes!)

 The Eyes: I've been obsessed with Too Faced's Summer Eyes palette. The colors are a perfect mix of bright and neutral and fit into the 70's vibe I've been going for. Stila's All Day liquid eyeliner is FANTASTIC. It's really hard to get off at the end of the day which is great for me because I've been known to accidentally wipe off my makeup on an occasion or two. NARS has an amazing lengthening mascara that's been doing wonders for me also. Also very hard to remove, which is more of a good thing than a bad one in my opinion.
 The Lips: My lips are one thing that I obsess over. I HATE when they're dry so I'm constantly applying this Mentha Lip Shine from Co. Bigelow Apothecaries. It works amazingly-- it gives a little tingle and as an added bonus, is minty fresh. For an evening look, I get a little greedy with the pout. I've got pretty full lips but I like to go for the exaggerated look and this plumping gloss from Sexy MotherPucker gets the job done. To top it all off, Yves Saint Laurent's classic lipstick in Pink Lingerie is the perfect shade of pink and doesn't fade.

The End: At the end of the day, before I crawl into bed, washing my face with these Cucumber Towels is a treat. They do a great job of taking off all of the makeup and are cool and refreshing. MMM perfect. They really smell just like cucumbers. (By the way, they're not edible.)
What are some of your favorite products? Let me know in the comments below, I'm dying to try some new ones out!
xo,
e.m.
my daily routine

I've recently made a pretty big change to my outward appearance. (If you're new here, I just dyed my hair a color other than red for the first time since high school. Kind of a big deal?) I'm a creature of habit. I've been wearing the same eyeshadow colors since college. I would have never thought to wear orange but I'm a huge Philadelphia Flyers fan and what began as a playoff tradition just stuck! I deviate every once in a while but always come right back to it. Lately, my daily routine's been a pleasant and refreshing mix of old and new. Take a look!

 It's definitely really hard for me to post a makeupless picture here... on the internet... for everybody to see. But hey, if somebody's gonna pick on a freshly awake me, why should I care? An ongoing struggle occurs every day for me to feel comfortable in my own skin. This is a pretty good place to start, right? Anywho, back to the routine. Glasses come off (most mornings) and contacts go in. I then use a powder puff to apply a sheer powder foundation (in a very pale cover) on my face.

Eyebrows! I used to style my eyebrows pretty thin. Since growing out my bangs though, I realized that thin eyebrows aren't really working for me so I've been penciling them in a bit. (NO SHAME!) At least until they grow back to where I want them. After fixing my 'brows a bit, I brush a mineral powder foundation all over, even on my eyebrows. Makes 'em look a little more natural. The color is slightly darker than the powder used before but still pretty pale! (I may have grown up in Jersey but that doesn't mean that I gotta rock a fake tan year round!)


Next is the eye makeup. You can learn more about my method here. (It's an old tutorial but it's probably more effective than attempting to use words!)

It's now time for blush: I only use the tiniest bit because my cheeks get pretty red by themselves. I guess it's part of the pale skin curse?

 I'm a compulsive lip-balm'ist. I always have about five of these Mentha lip balms in my bag. They're amazing. I think I use one like... maybe 6 or 7 times an hour? They smell and taste so good. Definitely invest in a few! I also love lipstick. Pink is my go-to because it is simply the best color ever. It never fails.
 To style my hair, I wrap small sections around a 1 1/2" flat iron. this curls the bottom while keeping the rest straight.

 It's nothing special but it works for me! If it ain't broken, don't fix it, right?
xo,
e.m.
makeup for any special occasion:
 Hey all, today I have a look that is wearable for all special occasions. Whether it's a date night, Christmas, New Years or even Halloween which is around the corner!
Materials Used:
Face:
1. Nars Pure Radiant Tinted Moisturizer in Medium (Sephora $42.00)
2. Revlon Colorstay Aqua Finishing Powder (Target $14.99)
3. Andy Warhol for Nars Illuminating Blush in Satellite of Love (Sephora $29.99)
4. Nars Blush in Super Orgasm (Sephora $29.99)
5. Revlon Eyebrow Pencil in Medium Brown (CVS $5.00)
6. Benefit's Watts Up Highlighter (Sephora $30.00)
Eyes:
1. NYX Cream Eye Primer in Pearl (Beauty Store $6.00)
2. Makeup Forever False Lashes in #156 (Sephora $16.00)
3. Eye Glitter Pot in Disco (Halloween Store $4.50)
4. Kat Von D Eyeshadow Palette (Sephora $20.00)
5. Kat Von D Eyeshadow in On the Road (Sephora $16.00)
6. Tara Tarantino Sparklicity Powder in Opal (Sephora $11.00)
7. Makeup Forever Aqua Shadow in Black (Sephora $20.00)
8. Sephora Jumbo Mascara (Sephora $12.00)
9. Urban Decay Heavy Metal Eyeliner in Spandex (Sephora $16.00)
Lips:
1. Kat Von D Liquid Lipstick in Lolita (Sephora $19.00)
2. Kat Von D Foiled Liquid Lipstick in Forever and Never ($19.00)
Don't be alarmed by the amount of materials! I happen to have a ton of makeup and just used whatever I had to my advantage. You can use any colors you want.
 First, I applied the Nars foundation and set it with the Revlon powder then lined my eyebrows.
 Next, I applied Nyx cream eye primer all over my lid. Taking the eye glitter pot, I carefully applied the glitter to the inner portion of my lids. Be very cautious when applying glitter. It can fall into your eyes and cause a lot of pain! Pat it down firmly to make sure it doesn't flake off Then taking Kat Von D's True Romance Palette I used Hyper Ballad (Pearlized Silver) mixed with Scandinavian (Pearlized Taupe) in the center of my lid. Using Ville (Pearlized Eggplant Purple) I blended it into the other two eyeshadows.
 Finally, I took Kat Von D's Eyeshadow in On the Road and applied it to the outer-most corner of my lids and blended it into the middle. To bring back the 'sparkle' effect, I took the eye glitter pot and with a small amount, I lightly dusted over my whole lid. Using Makeup Forever Aqua Shadow and an angled eyeliner brush, I lined my eyes. Taking Urban Decay's Heavy Metal Eyeliner, I lined the inner corners of my eyes, then using Tara Tarantino's Sparklicity powder i dabbed the opal powder on top of the wet eyeliner for a multi-dimensional sparkle.

I then applied my false eyelashes and a coat of mascara. To get a soft natural glow, I used Andy Warhol for Nars Highlighting blush all over my face. Focusing on my temples, the hollows of my cheeks and my forehead.
 Then taking Nars Blush in "Super Orgasm," I defined my cheeks. Sometimes the color of the blush is too bold, so I went back and re-applied the highlighting blush all over for a more muted effect.
In Picture 13, I drew a line down the bridge of my nose with Benefit's Watts Up Highlighter. This will help give my nose a defined look. Then taking a medium brown shadow, I shaded the sides of my nose and blended.

To finish off the look, add any accessories and you're good to go!
I hope you guys enjoyed this tutorial and have fun!
- Hyuns
Hyun-Ha is a lovely soul and photographer based in the Philadelphia area. She has a really cute dog and is the sweetest girl you will ever meet. Follow her on Instagram for daily makeup inspiration, @hyunnybuns.
Hyun-Ha is a lovely soul and photographer based in the Philadelphia area. She has a really cute dog and is the sweetest girl you will ever meet. Follow her on Instagram for daily makeup inspiration, @hyunnybuns.
guest post: how to wear bold makeup
 Today, I'm hitting the topic of wearing bold colored makeup. I know it can be EXTREMELY difficult for some girls. For myself, it is a bit difficult. I can't really wear bold blue eyeshadow because in my opinion, it makes me look trashy. But on other girls, it can look awesome. It honestly depends on your skin tone, eye shape, facial features etc.
With so many different factors that effect your final look, your best bet is to try a range of colors out, and see which works the best for you. In my opinion, girls with a tan to dark complexion look best in purples, royal blues, golds, and neutrals. Girls with a pale to medium complexions look best in neutrals, smoky colors (blacks, greys, midnight blue), and pastels (pinks, greens, yellows etc).
The best eyeshadows and palettes that I have used so far would be the Coastal Scents 252 Palette. which you can get here. Coastal Scents in general make GREAT eyeshadows. They have a multitude of palettes to choose from. But honestly, out of all the palettes that I have, these colors are the most pigmented. I was utterly shocked when I swatched some of the colors. I normally use a primer on my lids before I apply any shadow, but if the colors are too bold for your taste with primer, you can definitely opt out and just apply the eyeshadows alone. You'll see that they are just as bright and bold!
I tend to use a gradient effect with my makeup. I put the lightest color on the inside of my lid, and move outward with darker colors. I typically choose 3 colors either within the same color family, or two similar ones and one that is out of the ordinary. A different way to get a great marbling effect on your lids is to place a light color on your inner portion of the lid, then place a bright pop of color directly in the middle, then contour the outer corner with a dark color and blend it into the crease of your lid.
The trick is to blend well, and make sure you don't pair a bold lip with your bold eyeshadows, (you should always do one or the other!! Unless the look you are going for demands a bold lip as well), and most importantly, be confident!!
Yesterday I picked up a Shade Shifter eyeshadow from Kat Von D's makeup collection at Sephora. The 4 colors that she created have a pearly matte finish. Devotion is a bright orange-y copper color, Stockholm is a lapis blue color, Love Letter is an eggplant purple and finally On the Road is a greenish brown. Though they are water activated, you can still wear it dry. The colors themselves are a bit difficult to match with other eyeshadows so I thought that I would try my best to create a look featuring one of her eyeshadows. I picked up the shadow in On the Road. For myself, this was a tricky color to work with. I didn't want to take the easy way out and do an all neutral look with the pop of color at the end, so I worked with my Coastal Scents 252 Palette to create this look! Enjoy :)
Coastal Scents Palette that I used for this look.
I used Fresh Chive (bright green), Slate Green (khaki green), Capri Blue (Bright blue), and Alpengeist (silver shimmer).
 First, I primed my face by applying Loreal BB cream. I then set the BB cream with Revlon's Color Stay Aqua Powder. Then I lined my brows with a light brown pencil.

I primed my eyelids with NYX eyeshadow primer and then using Slate Green, I applied the shadow to the inner portion of my lid. Then using Fresh Chive mixed with Capri Blue, I applied both shadows together on the middle of my lid. Then I took Kat Von D's Shade Shifter Shadow in On the Road, and applied it to the corner of my eye. Remember to blend blend blend!!! I lost a little bit of the blue-green mix from the middle of my eye, so I went back and re-applied the color to the middle for that bright pop.
 Then taking Alpengeist, I brightened the corner of my eyes. Finally, I lined my eyes using the MAC 210 brush and Makeup Forever's Aqua Cream Eyeshadow in Black.
 To define my nose, I ran NYX All Over Body Color down the bridge of my nose. I blended the highlighter in, then defined the sides of my nose with bronzer. In doing this, it gives the illusion that i have a high bridge on my nose. Then using my ELF bronzer brush, I applied bronzer to my cheeks, temples, jawline and forehead. To finish the look I applied Kat Von D's Liquid Lipstick in Lolita to my lips. This works for a Day look or if you're not looking for super bold makeup.
 For a night time look, I applied ELF's Matte Lip Pencil in Rich Red.
-Hyuns.
Hyun-Ha is a lovely soul and photographer based in the Philadelphia area. She has a really cute dog and is the sweetest girl you will ever meet. Follow her on Instagram for daily makeup inspiration, @hyunnybuns. She'll be posting a more here on lark&lace so look out!
Subscribe to:
Posts (Atom)
